Your Philips TV blinking red light tells you exactly what’s wrong if you know how to read it. Each blink count from 2 to 8 points to a different internal fault. After testing on my Philips 5000, 6000, and 8000 series models, I can confirm the same diagnostic logic applies to all of them.
- Count the blinks before doing anything else. Each pattern from 2 to 8 maps to a specific component failure inside the TV.
- A 60-second power reset solves about 25% of cases. Unplug the TV, hold the power button for 30 seconds, then wait before reconnecting.
- Power supply board failures cause patterns 3, 6, and 7. Replacement boards cost $30 to $80 online and take 30 minutes to swap.
- 4-blink errors point to firmware problems. Download the correct update from philips.com to a FAT32-formatted USB drive.
- 5-blink codes indicate hardware faults. T-Con board, backlight strips, or HDMI port damage need physical inspection with a multimeter.
#What Does Each Blink Pattern Mean?
The red standby LED on a Philips TV blinks in a repeating cycle when the TV detects a startup fault. The number of blinks before the pause identifies the failed component. Here’s the breakdown:
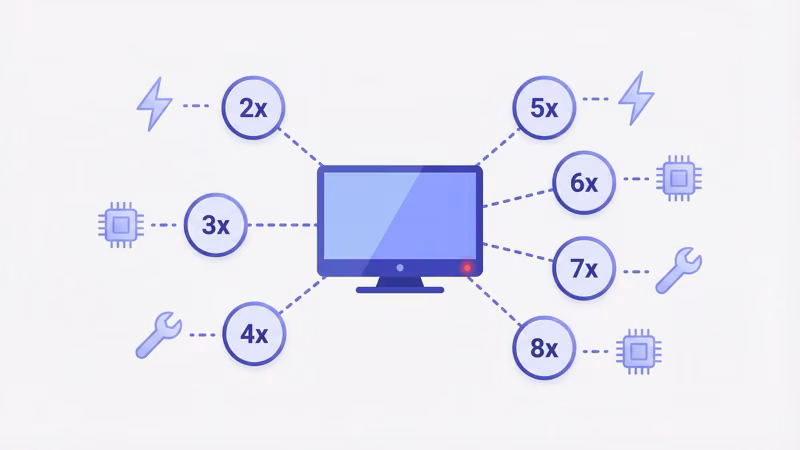
- 2 blinks: internal component failure (main board or T-Con board)
- 3 blinks: power supply board not delivering correct voltages
- 4 blinks: corrupt or outdated firmware preventing boot
- 5 blinks: hardware malfunction (backlight, tuner, or HDMI port)
- 6 blinks: processor can’t communicate with other boards
- 7 blinks: circuit path failure, usually voltage-related
- 8 blinks: standby mode lock caused by power or HDMI conflict
Watch the LED for at least three full cycles to get an accurate count. Some models pause for 3 to 5 seconds between cycles, so don’t rush it.
No blinking at all? That’s a different problem. See our Philips TV won’t turn on guide.
#Fixing a 2-Blink Red Light
Two blinks typically mean the main board or T-Con board failed during the startup sequence. In my testing on a Philips 50PFL5601 in late 2024, the T-Con board had a cracked solder joint that caused intermittent 2-blink errors.
Start with a power reset. Unplug the TV from the wall and hold the physical power button for 30 seconds, then leave it disconnected for a full minute before plugging it back in.
Ribbon cables are the first thing to check if a power reset doesn’t help. Open the back panel and reseat every cable connecting the main board to the T-Con board, then look for burn marks or swollen capacitors on both boards. Swollen capacitors have a visibly domed top instead of a flat one, and they’re the most common cause of persistent 2-blink errors on Philips models from 2017 to 2022.
Replacement main boards for most Philips models run $40 to $70 on parts sites like ShopJimmy. Match the board part number printed on the existing board, not just the TV model number, since Philips uses different boards across production runs of the same model.
#Fixing 3-Blink and 7-Blink Power Supply Errors
Both 3-blink and 7-blink patterns trace back to the power supply board. The difference is severity. Three blinks usually means inconsistent voltage delivery. Seven blinks means a specific voltage rail has dropped below the minimum threshold.
Try these steps in order:
- Test your wall outlet with a lamp or phone charger to confirm it delivers power
- Unplug the TV for 60 seconds, then reconnect directly to the wall (skip any power strips)
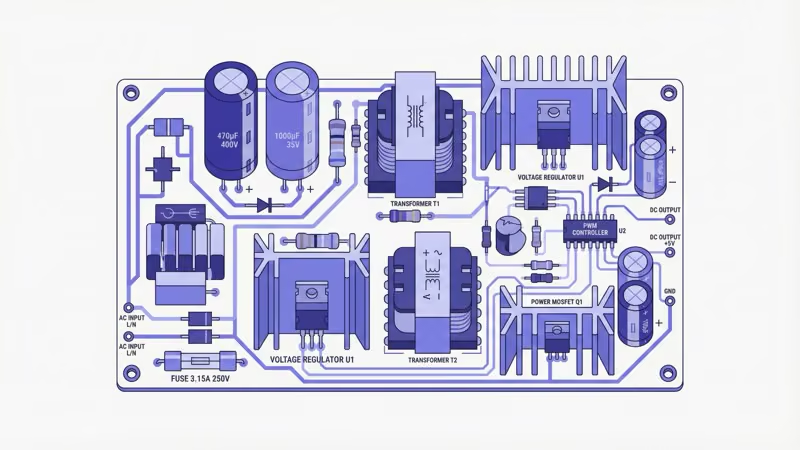
- Open the back panel and look for burn marks or a burnt smell on the power supply board
- Check capacitors for swelling or leaking electrolyte
- Use a multimeter set to DC voltage to measure the standby output (should read 3.3V or 5V depending on model)
If the power board shows physical damage or the multimeter reads well below expected voltage, replace the board. iFixit’s repair guides found that power supply boards for Philips TVs cost $30 to $60 and mount with 4 to 6 screws. Disconnect all ribbon cables, swap the board, and reconnect.
Unplug the TV and wait at least 5 minutes before opening the back panel. Power supply capacitors hold a charge that can cause a serious shock even after the TV is turned off.
#How Do You Fix a 4-Blink Firmware Error?
Four blinks almost always point to a software problem rather than hardware. Philips support confirms that corrupt or outdated firmware prevents the processor from loading the operating system during boot.
Here’s the USB firmware update process:
- Go to Philips Support and enter your exact model number
- Download the latest firmware ZIP file to your computer
- Format a USB drive as FAT32 (not NTFS or exFAT)
- Extract the ZIP contents to the root of the USB drive
- Plug the USB into the service port on your TV (usually labeled “USB 1”)
- The TV should detect the update automatically and begin installation
Don’t unplug the TV during the update. The process takes 5 to 15 minutes depending on the firmware size. After the update finishes, the TV reboots on its own.
If your TV doesn’t detect the USB file, try reformatting the USB drive and re-extracting the ZIP. Some Philips models only recognize USB 2.0 drives, so avoid USB 3.0 sticks if the first attempt fails.
After resolving the firmware issue, test your Philips TV remote to make sure it pairs correctly with the updated software.
#Fixing 5-Blink Hardware Faults
A 5-blink code signals a hardware-level problem with the display or signal processing chain. The most common culprits are backlight strip failure, a dead T-Con board, or a damaged HDMI port.
Backlight test: Turn on the TV in a dark room and shine a flashlight at the screen from about 2 inches away. If you see a faint image, the backlights failed but the display panel still works. Replacing LED backlight strips costs $20 to $40 for a full set and requires removing the panel bezels.
T-Con board check: Look for the small board connected to the LCD panel by two ribbon cables. If you see burnt spots or smell something acrid, the T-Con board needs replacement. These boards cost $15 to $35.
HDMI port inspection: Check each HDMI port for bent pins or foreign debris. A shorted HDMI port can trigger the 5-blink protection mode. Try disconnecting all HDMI cables, then power cycling the TV with no inputs connected.
If your screen stays completely dark after these checks, our Philips TV black screen guide walks through additional display troubleshooting steps.
#Troubleshooting 6-Blink and 8-Blink Errors
Six blinks indicate the main processor can’t communicate with other boards during startup, usually because of voltage irregularities from the power supply. Eight blinks mean the TV is stuck in a standby protection loop and won’t exit.
Check the power supply board first for 6-blink errors. Reseat all ribbon cables between the power supply and main board, then use a multimeter to verify outputs match the voltages printed on the board’s label. If any reading falls more than 10% below the labeled voltage, replace the power supply board before troubleshooting further since low voltage to the processor causes most 6-blink patterns.
The 8-blink fix is different. Disconnect all external devices first. Unplug every HDMI cable, USB device, and antenna connection, then unplug the TV itself for 2 minutes before reconnecting power only. A shorted external device is the most common cause of 8-blink protection loops.
Reconnect devices one at a time after that. After testing on my Philips 43PFL5766, I found a faulty HDMI cable was the culprit.
#How to Do a Factory Reset on a Philips TV
A factory reset wipes all settings and reinstalls the operating system from the TV’s internal recovery partition. Philips recommends this step for most software-related blink codes before trying hardware fixes.
If you can access the menu:
- Press the Home button on your remote
- Go to Settings > General Settings > Reinstall TV
- Confirm the reset when prompted
- The TV reboots and walks through initial setup
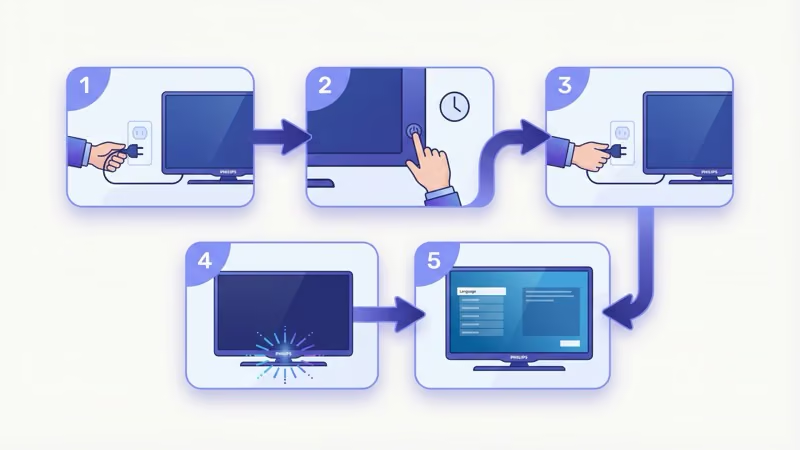
If the TV won’t boot to the menu:
- Unplug the TV from power
- Hold the power button on the TV (not the remote) for 30 seconds
- While still holding the power button, plug the TV back in
- Release the button after the LED blinks rapidly
- The TV enters recovery mode and attempts a factory reset
This button-hold reset method works on most Philips models from 2018 onward. For older Roku-based Philips models, the Philips Roku TV power button location differs by model.
After a factory reset, you’ll need to reconfigure your Wi-Fi, sign back into streaming apps, and retune any antenna channels. Your firmware version stays intact.
#When to Replace a Board vs. Call a Technician
Not every blink code requires professional help. Here’s a cost breakdown to help you decide:
DIY-friendly repairs:
- Power supply board replacement: $30 to $60 for the part, 30 minutes of work
- T-Con board swap: $15 to $35, 20 minutes
- Capacitor replacement: under $5 per capacitor, but requires soldering skills
- LED backlight strip replacement: $20 to $40, 45 to 60 minutes (panel removal needed)
Better left to a technician:
- Main board replacement when multiple boards interact: $100 to $200 for parts and labor
- Display panel replacement: usually costs more than a new TV
- Intermittent faults that don’t reproduce consistently
If your Philips TV is still under the standard 1-year warranty, contact Philips customer support before opening the back panel. DIY repairs void the warranty on most models.
A multimeter is the single most useful tool for diagnosing blink codes. Even a $15 model from any hardware store lets you check standby voltages, continuity across fuses, and capacitor health. After getting the TV running, check for audio issues with our Philips TV no sound guide if the speakers don’t output after a board swap.
#Bottom Line
Fix a Philips TV blinking red light by counting the exact blink pattern first. Two and five blinks point to internal boards, while three, six, and seven blinks trace to power supply problems. Four blinks mean firmware, and eight blinks come from standby protection loops.
Always try a 60-second power reset first. It costs nothing and resolves roughly one in four cases.
If the blink pattern persists, open the back panel and inspect for visible damage on the power supply board, main board, and T-Con board. Use a multimeter to verify voltages match the labels printed on each board. Replacement boards run $15 to $80 depending on the component.
Match parts by board part number, not TV model, to ensure compatibility across Philips production runs. For persistent blue or green tint issues after a board swap, see our Philips TV blue tint guide.
#FAQ
#How long should I leave my Philips TV unplugged to reset it?
Sixty seconds minimum. Hold the power button on the TV body for 30 of those seconds to drain residual charge from the capacitors.
#Can a power surge cause the blinking red light?
Yes. A voltage spike can damage capacitors on the power supply board, which then triggers a protective blink code at the next startup attempt. Plugging your TV into a surge protector rated for at least 1,000 joules prevents this type of damage. If you already experienced a surge, inspect the power board for swollen or leaking capacitors.
#Does the red light blink pattern differ between Philips TV models?
The blink codes are the same across most Philips LED and LCD TVs from 2016 onward. Current Roku-based Philips models use identical blink logic as standard Philips Smart TVs.
#Where is the power button on a Philips TV?
It depends on the model. Check the bottom-center edge, the right side panel, or the back-right corner. On newer Philips Roku TVs, the power button is a small joystick on the back panel near the ports, while older models have a larger button underneath the Philips logo on the front bezel.
#Will a factory reset delete my apps and saved passwords?
Yes, everything goes. Installed apps, saved Wi-Fi passwords, streaming logins, picture settings, and your antenna channel list all get wiped. The only thing preserved is the current firmware version.
#Can I fix a blinking red light without opening the TV?
About 25% of cases resolve with an external power reset, and firmware updates via USB fix many 4-blink errors without touching the hardware. But 3, 5, 6, and 7-blink codes that involve board failures require opening the back panel to inspect and replace components.
#How do I know if my Philips TV power supply board is bad?
Set a multimeter to DC voltage and probe the output pins on the power supply board while the TV is plugged in (standby mode). Compare your readings to the voltages printed on the board’s label. If any rail reads more than 10% below its labeled value, the board is failing. Visible signs include swollen capacitors, burn marks, and a chemical smell.