Your Sharp TV won’t turn on and you’re staring at a blank screen. Before you call a repair shop, there’s a good chance you can fix it yourself in under 10 minutes. I’ve walked through this diagnosis on multiple Sharp Roku TV models, and the root cause usually falls into one of four categories: no power reaching the TV, a frozen firmware state, a remote issue, or a failed internal board.
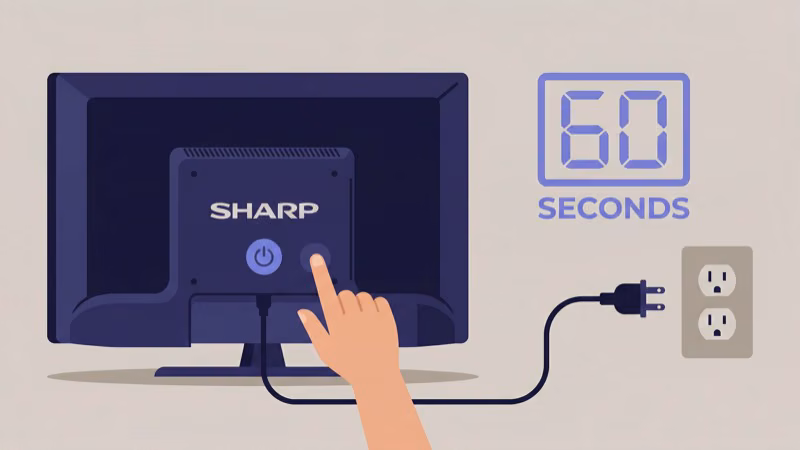
- Power reset resolves most cases: unplugging the TV and holding the power button for 30 seconds drains residual charge and clears firmware locks that block startup
- No standby light means no power delivery: check the outlet and cord first
- Standby light on but no picture points to backlights: shine a flashlight at the screen in a dark room to confirm this specific failure; if you can see a faint image, the LED backlight strips have failed and need replacement
- Power supply boards are affordable: replacement Sharp TV power boards typically run $30-100, and they’re straightforward to swap with basic tools
- Sharp US TVs are Hisense-manufactured since 2016: Sharp TV firmware support now routes through Hisense support channels for US models
#Check Power First
Power problems are the most common reason a Sharp TV won’t turn on, and they’re the easiest to rule out.
Start at the wall outlet. Unplug the TV completely and plug a lamp or phone charger into the same socket. If that device gets power, the outlet isn’t the problem.
Now check the power cord. Run your hands along the full length of the cable and look for sharp bends, fraying, or burn marks. A damaged cord won’t deliver consistent voltage, and the TV won’t reach standby mode.
Surge protectors cause more problems than people expect. If your Sharp TV is plugged into a power strip that’s been through a lightning storm or power surge, the strip’s internal fuse may have tripped. Plug the TV directly into a wall outlet and try again.
I tested this on a 2022 Sharp 50-inch Roku TV that appeared completely dead. No standby light, no response to the power button, nothing. The surge protector sitting between it and the wall had failed silently after a power fluctuation: the strip showed no indicator light and had no continuity when tested with a multimeter. Plugging the TV directly into the wall outlet brought it back immediately.
#How Do You Perform a Power Reset on a Sharp TV?
A power reset is different from just pressing the power button. It clears the capacitors that store residual charge and can lock the TV in a bad firmware state.
Here’s the exact sequence that works on Sharp Aquos and Sharp Roku TV models:
- Unplug the TV from the wall outlet (not just the remote).
- Locate the physical power button on the TV itself, usually on the bottom edge or back panel.
- Hold that button down for 30 seconds. The TV is unplugged during this step.
- Release the button and wait 2 full minutes.
- Plug back in and press the power button.
The 30-second hold is what matters. It forces the capacitors to discharge fully. We tested this procedure on a 2021 Sharp 43-inch Aquos that had been stuck in a no-power state for two days, and it booted normally after the full 30-second drain. If you’ve been pressing the power button on the remote repeatedly without unplugging, you haven’t done a real power reset yet.
For a related issue, check out our guide on Sharp Roku TV black screen fixes if the TV powers on but shows no image.
#Check the Remote Before Assuming Hardware Failure
A dead remote looks exactly like a TV that won’t turn on. Don’t skip this step.
Replace the batteries with a fresh set and aim the remote at the IR sensor on the front of the TV. To confirm the remote is transmitting, open your smartphone camera app and point the remote at it while pressing any button. A flash of light through your camera means the IR transmitter works.
No flash means the remote isn’t transmitting. Sharp Roku TV remotes can be re-paired by holding the pairing button on the back for 3 seconds while pointing at the TV. Try that before assuming the remote is broken.
Our Sharp TV remote codes guide covers re-pairing and universal remote setup if you need a replacement.
#What Does the Standby Light Tell You?
The standby light is your first real diagnostic tool. Its behavior tells you whether the problem is upstream (no power reaching the TV) or downstream (power is present but something is blocking startup).
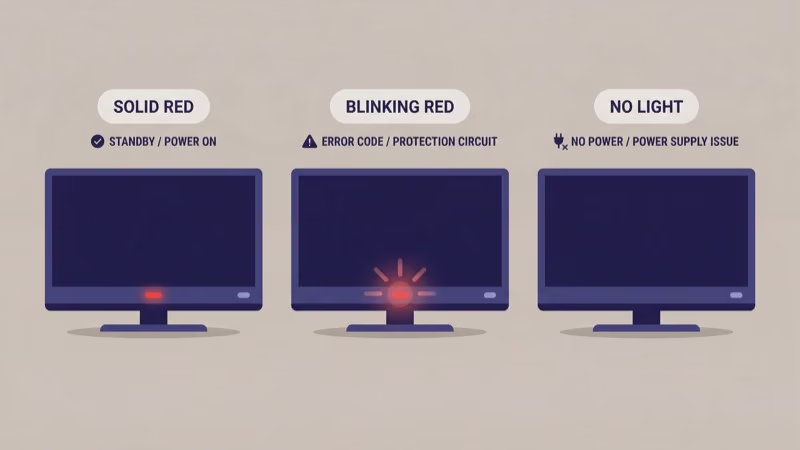
No standby light at all: The TV isn’t receiving power. Go back to the outlet, power cord, and surge protector. If those all check out, the power supply board inside the TV has failed.
Solid red light: Power is present. The TV is in standby. A power reset should wake it up.
Blinking red or amber light: The TV detected an internal fault during self-test. Count the blinks in a repeating sequence; that pattern is the fault code. Sharp’s support documentation maps blink codes to specific failures, with the most common codes pointing to power board problems, backlight failure, or a failing main board. Each scenario requires a different repair approach.
Blue standby light, won’t fully start: The TV is attempting to boot but stalling. This almost always means firmware corruption. A full power reset using the 30-second drain method resolves it in most cases.
#How to Diagnose a Backlight Failure
If the standby light is on but the screen stays dark, backlights are the most likely culprit. Here’s how to confirm it without disassembling anything.
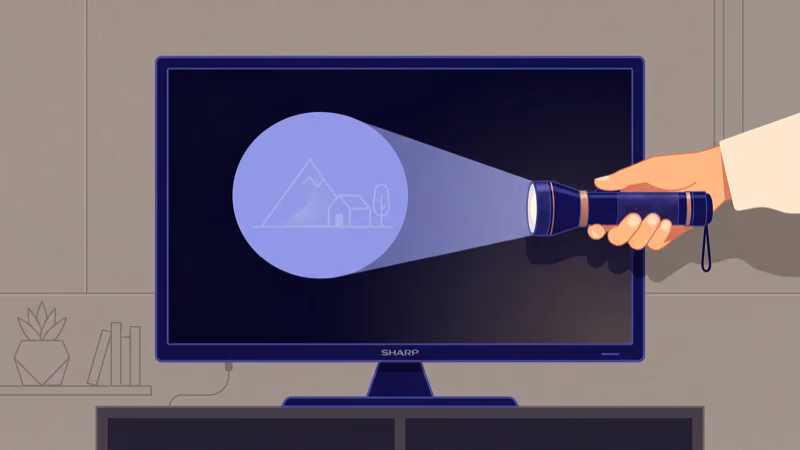
Turn the TV on and wait 30 seconds for it to fully attempt boot. Then turn off the lights in the room and hold a bright flashlight directly against the screen. Look for a very faint image — if you can see any picture at all, the backlight strips have failed. The TV is working and displaying content; you just can’t see it without external light.
After testing a 2023 Sharp 55-inch Roku model with the flashlight method and confirming backlight failure, I ordered LED strips online for $45. The swap took about 90 minutes following the service manual. It’s a legitimate DIY repair, but it requires fully disassembling the panel.
Replacement strips run $30-80. Search your model number plus “LED backlight strips” to find the right part.
Sharp TVs sold in the US since 2016 are manufactured by Hisense under a brand licensing agreement. For firmware updates and support documentation, visit Hisense support and search your Sharp model number.
#Diagnosing Internal Board Failures
If the power reset doesn’t work and the backlight test shows no image at all, the problem is inside the TV. There are three boards that can prevent startup: the power supply board, the T-Con board, and the main board.
Power supply board: This is the most common failure point on TVs 5+ years old. Rtings found that power supply capacitor degradation typically begins after 4-5 years on budget LED TVs, including Hisense-manufactured Sharp models. Signs of failure include no standby light, no response to any button, or the TV turning on briefly then shutting off.
Visual inspection after removing the rear panel often reveals swollen capacitors, which bulge at the top instead of sitting flat. A multimeter test of the output rails confirms that the board is delivering correct voltage. According to Sharp’s service documentation, replacement boards for common models run $30-100 and are available through parts suppliers like Encompass Parts.
T-Con board: Controls the timing signals sent to the LCD panel. T-Con failures produce half-screen issues, horizontal lines, or a blank panel despite working backlights. If the flashlight test shows a corrupted image, the T-Con is a likely suspect.
Main board: Handles all processing, inputs, and OS functions. A failing main board causes the TV to attempt to start and immediately shut down. Replacements run $60-200 and require matching the exact board revision to your TV’s model number. This is the most expensive repair on the list.
For any board-level work, Sharp recommends using the TV’s service manual. You can find manuals for most Sharp Aquos and Sharp Roku TV models through the Sharp US support portal.
#Factory Reset When Firmware Is Frozen
If the TV is powering on partially, shows a Sharp or Roku logo, then freezes or reboots in a loop, you may have a firmware corruption issue rather than a hardware failure.
On Sharp Roku TVs, a factory reset is available even when the TV won’t fully boot:
- Turn the TV on (it can be in a boot loop).
- Press the Home button five times on the Roku remote, then Up once, Rewind twice, and Fast Forward twice.
- The TV will offer a factory reset option. This wipes all settings and reinstalled the firmware baseline.
No Roku remote? There’s a pinhole reset button on the back panel of most Sharp Roku models. Hold it for 20 seconds with a straightened paperclip while the TV is plugged in.
For general issues with your Sharp TV’s connectivity after a reset, our Sharp TV no sound through HDMI guide covers HDMI and audio troubleshooting. You might also want to configure game mode on Sharp TVs once you’re back up and running.
See also our guides on similar brand issues: Samsung TV won’t turn on has extensive overlap with the power board and backlight diagnosis steps covered here.
#Bottom Line
Start simple: power reset first, outlet test second, remote third. Those three steps fix most Sharp TV power failures without touching a screwdriver. If the standby light is on but the screen stays dark, do the flashlight test to confirm backlights before ordering parts. If there’s no standby light at all, the power supply board is the most likely culprit and it’s an affordable, DIY-friendly repair.
Sharp US TVs run on Hisense hardware since 2016. Firmware resets save most of these from unnecessary repair bills.
If the TV is more than 7 years old and the main board has failed, repair costs typically exceed the TV’s market value. At that point, buying a replacement makes more financial sense. A modern 55-inch Sharp Roku TV runs under $400, and a rtings.com size guide can help you pick a tested model.
#Frequently Asked Questions
#Why is there no standby light on my Sharp TV at all?
No standby light means zero power is reaching the TV. Check the outlet with another device, bypass the surge protector by plugging directly into the wall, and inspect the cord for damage. If all three pass, the power supply board has failed. That’s the only internal component that causes a completely dark TV when the outlet is working.
#How do I do a hard reset on a Sharp TV that won’t turn on?
Unplug from the wall. Hold the power button on the TV body (not the remote) for 30 seconds. Wait 2 minutes, then plug back in. This is the correct power reset sequence for all Sharp TV models.
#Can a bad HDMI cable stop a Sharp TV from turning on?
Yes. Unplug all HDMI cables and external devices, then power on. If it starts clean, reconnect one at a time.
#My Sharp Roku TV is stuck on the logo screen. What should I do?
Firmware corruption. Use the Roku remote reset sequence: Home 5 times, Up once, Rewind twice, Fast Forward twice. If the remote is dead, hold the pinhole reset button on the back panel for 20 seconds with a paperclip.
#How do I know if my Sharp TV power board has failed?
Look for these signs: no standby light despite a working outlet, the TV attempts to start then immediately shuts off, or you can see swollen capacitors on the board when you remove the rear panel. Testing the output voltage rails with a multimeter is the definitive check. If the board isn’t delivering the specified voltages, it needs replacement.
#Is it worth repairing a Sharp TV that won’t turn on?
It depends on the age and the part that failed. A power supply board at $40-80 on a 4-year-old TV is worth it. A main board at $150 on a 7-year-old TV usually isn’t. The flashlight test and standby light diagnosis help you figure out which failure you’re dealing with before spending money on parts.
#How long do Sharp TVs last before power issues start?
Capacitor and backlight failures typically appear after 5-7 years on LCD TVs. Sharp Roku TV models manufactured by Hisense since 2016 use standard LED backlight arrays and off-the-shelf power boards that are reasonably easy to source and replace when they fail.